This was a fun flight to provide a remote serial terminal on a Pi, between ground and a high-altitude balloon, using a bi-directional radio link.
LoRa Possibilities
Most high altitude balloon flights use a simple unidirectional data stream from the balloon to the ground, sending the telemetry (balloon position and sensor data) and sometimes images too, from balloon to the ground. Most often this is RTTY or (in the USA APRS) but there are alternatives such as LoRa which more easily provides a means of reliably transmitting data to the balloon as well as from it. This greatly expands the range of things we can do during a balloon flight, for example:
- A ground station can request re-sends down to the ground of missing data (image data or anything else) – see http://www.daveakerman.com/?p=2195
- A balloon can repeat data from other balloons, which might be flying or have landed – see http://www.daveakerman.com/?p=1850
- Uplink to request cutdowns
- Uplink to provide a guided parachute or parafoil with a new target landing position
You are in a maze of twisty little passages
Another possibility is to run a terminal session between ground (client) and balloon (host), allowing programs to be run on the balloon tracker as requested by a ground station:
This could even be used to change the tracker program, or have that program use new configuration parameters. Here though I’m going to use an idea provided by Philip Heron – run an old text adventure game. And to make this a group experience, I added a web dashboard that displays the terminal window in real (ish) time. The following diagram shows how this is achieved in software:
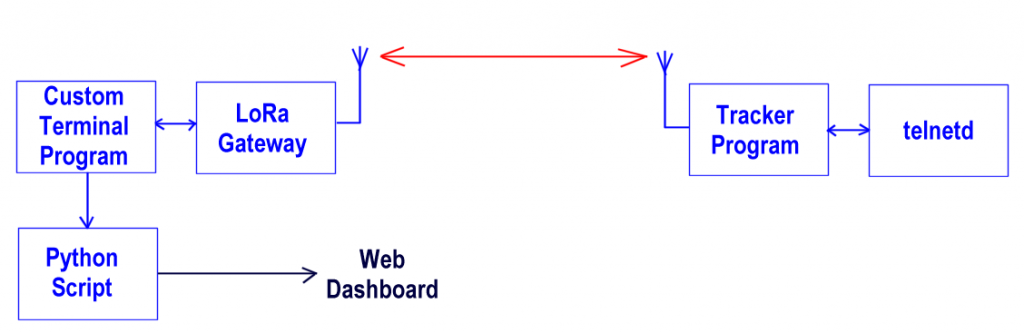
The LoRa gateway is the standard release with modifications added to provide a server socket on a specified port, to which any network terminal program (e.g. putty) can connect. In this case I have written a simple terminal program, in Delphi, that screen-scrapes the terminal window and sends the contents to a Python script, which then updates a web dashboard so that anyone with the URL can see what I see in my terminal program. Separately (and not shown on this diagram) another Python script updates the same dashboard with the current telemetry, using data from the habitat system.

Each time that a key is pressed in the terminal window, the key character is sent to the gateway that stores it ready for radio upload to the balloon tracker. Normally with balloon trackers, they transmit all the time, but instead this tracker sits listening for an uplink, to which it replies immediately. So the gateway program reads the keys sent to it from the terminal program, adds them to a custom message, and sends the result to the tracker. Assuming the messages arrives intact, the tracker replies with an ACK; any other reply (or no reply at all) results in the message being re-sent.
At the tracker, these messages result in those key codes being sent to the telnetd program (telnet daemon) which is an installable program on Raspbian. That program provides a regular command interface – same as a login on a Pi using a keyboard and monitor – and any responses to those key codes are sent back from telnetd to the tracker program, where they are included in messages sent back to the ground.
Periodically, when the tracker receives an uplink it will reply with a telemetry string so that the gateway can upload the balloon position to habitat as usual. The string is standard except for the addition of some status information about the uplink. There’s also a timeout so that if no uplink is received for a while, telemetry is sent anyway (useful for tracking after landing).
Houston, We Have Another Idea
As the Apollo missions of the 1970’s were a major part of my inspiration for my very first high altitude balloon launch, it seemed entirely appropriate to push the retro theme of this flight a stage further and try to replicate an Apollo mission control console. So I grabbed a suitable photograph from the web, edited it fairly heavily, and incorporated in a new web server program that populates the screen with balloon telemetry and the terminal session. I wrote this in Delphi, with some Python to grab the telemetry from Habitat. I opted for a green-screen monitor though (I later noticed) the Apollo screens had white screens. I think green looks better!

Radio Waterfall
This is what it looks like in action, minus the web dashboard:
https://youtu.be/zq7Abui3Lds
LoRa packets are up to 255 bytes, so long sections of text are downloaded in chunks of a bit less than that length (there’s some overhead of course), so the terminal window is updated in chunks also. That window is screen-scraped every 1 second, and the results are pushed to the web dashboard at that rate or slower (depending on the time needed to post to the server). The following video shows the terminal window and dashboard, for a short session that includes logging in to the tracker, running a couple of basic Linux commands, and then starting the Colossal Caves adventure game.
https://youtu.be/FIJEU46S5y0
Choice Of Frequency
We have a range of frequencies available to us for balloon flights, with different restrictions according to power and duty cycle. For this flight the duty cycle (proportion of time spent transmitting) is between 50% and near 100%, so I had to choose frequency in the band that allows that.
It’s also important to choose a frequency that doesn’t have a lot of use from other devices. For those receiving on the ground, they may be near ISM (Industrial Scientific and Medical) devices such as oil level senders, weather stations etc, that can be bothersome if transmitting near the receiver. For the flight though, it can potentially hear transmitters over 100’s of miles, so about a year ago I did a test flight to scan the spectrum and report on the signal levels as received by the balloon. The results of that test showed that some frequencies are 15dB better (which is a lot) better than others:

The quietest area does not allow 100% duty cycle (which is probably why it’s the quietest!) so I chose a frequency centred on the quietest area that does; namely 434.225MHz.
Payload
Normally I would use a PITS tracker, but as I didn’t need RTTY I decided to use a custom GPS+LoRa board, atop a Raspberry Pi model A+. Power came from an AA “emergency phone charger” with 4 Energizer Ultimate Lithium cells. The lid of this was firmly taped down with duct tape, and the cells held in place with double-sided pads, but even so the Pi rebooted when it landed. Not an issue but a reminder that soldered cells are best!
As usual, the lot went into a Hobbycraft polystyrene box, with GPS aerial on the top and a 1/4 wave aerial on the bottom, made from an SMA bulkhead plug and 5 pieces of guitar wire.
The Launch
The conditions were favourable, without too much ground wind (makes it difficult to launch) or high level winds (can take the flight a long way away); I wanted the flight to stay fairly close to give the uplink the best chance of working throughout the flight.
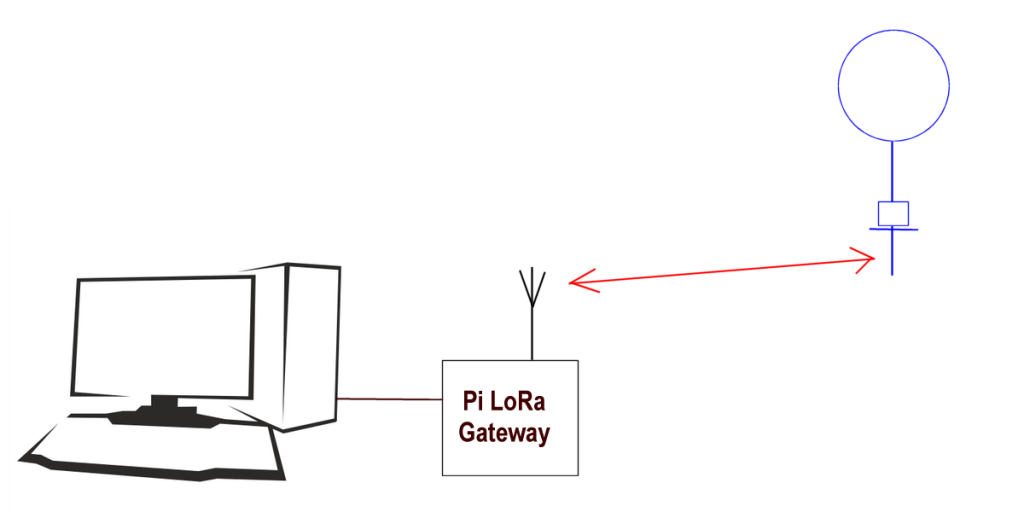
First step was to get all the ground-station software started (LoRa gateway, Telnet terminal client, web server (for Apollo dashboard) and Python scripts for updating the two dashboards (Apollo and thedash.com) with telemetry and terminal data. I intended to use a gateway up on my Clark mast, for the best range, but that position is beyond the reach of my house wifi signal, and the TP-Link repeater I bought the day before completely failed to extend the signal far enough. Soon I’ll have my shed (next to the mast) wired to the house network, and that problem will go away. Meanwhile though, I had to go with the LoRa gateway in the house, using a short colinear aerial in the loft.
With the software all set up, I started the tracker, checked that the 2-way communications was all working as expected, and then filled the balloon. I chose a 350g Hwoyee, a 24″ Sphereachute, and a gas fill to have the flight land south of Monmouth. I needed to launch by about midday as after the the flight would land further east, increasing the risk of a tree landing. The launch itself was easy, with little wind.
The Flight
As mentioned, I only had a loft aerial to communicate with the flight, but that worked very well, both for uplink and downlink; very few missing packets on the uplink, and a last position from an altitude of 390 metres.
Once I got back to my PC after the launch, I typed a few commands into my remote terminal window, with the results then being relayed to the dashboard webb pages along with telemetry:
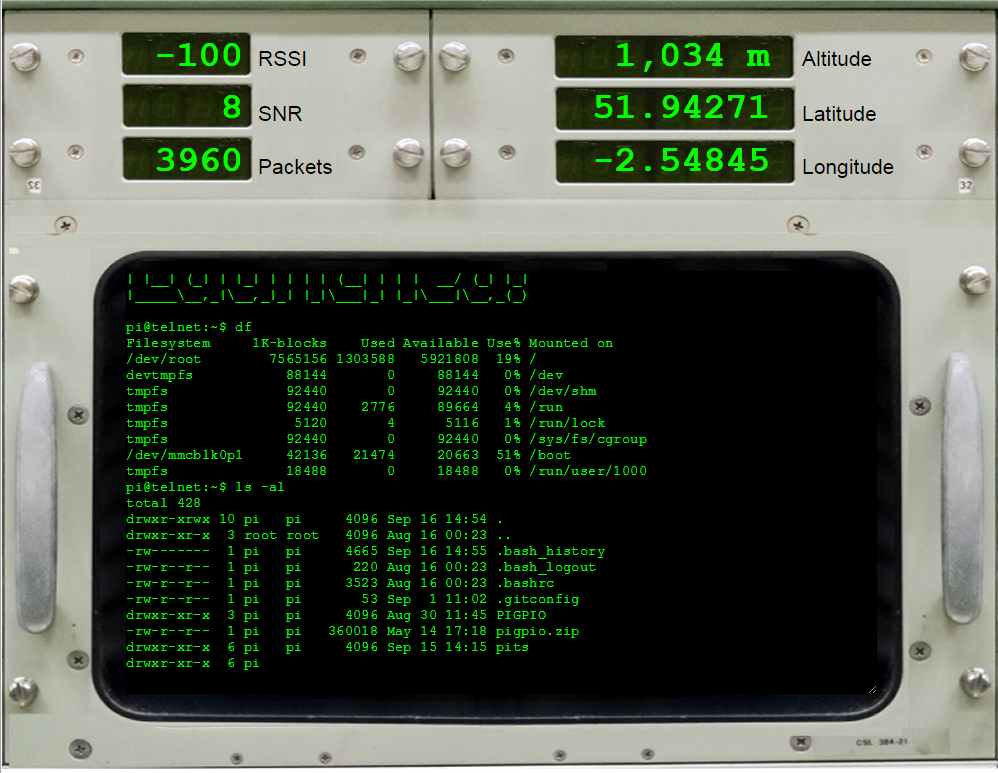
The upper section shows the latest telemetry, as received either by my gateway or by at least one of the other gateways operated by the HAB community. The left side shows what the payload is reporting for messages it has received from the ground; the right side is basic GPS information.
The lower section shows a copy of the terminal window from my PC. There is some latency in the system, with screen updates relying on the approx 1400 bps downlink from the balloon, plus some delays as the terminal is polled then changes sent to the web server and distributed over the web. It was though entirely usable.
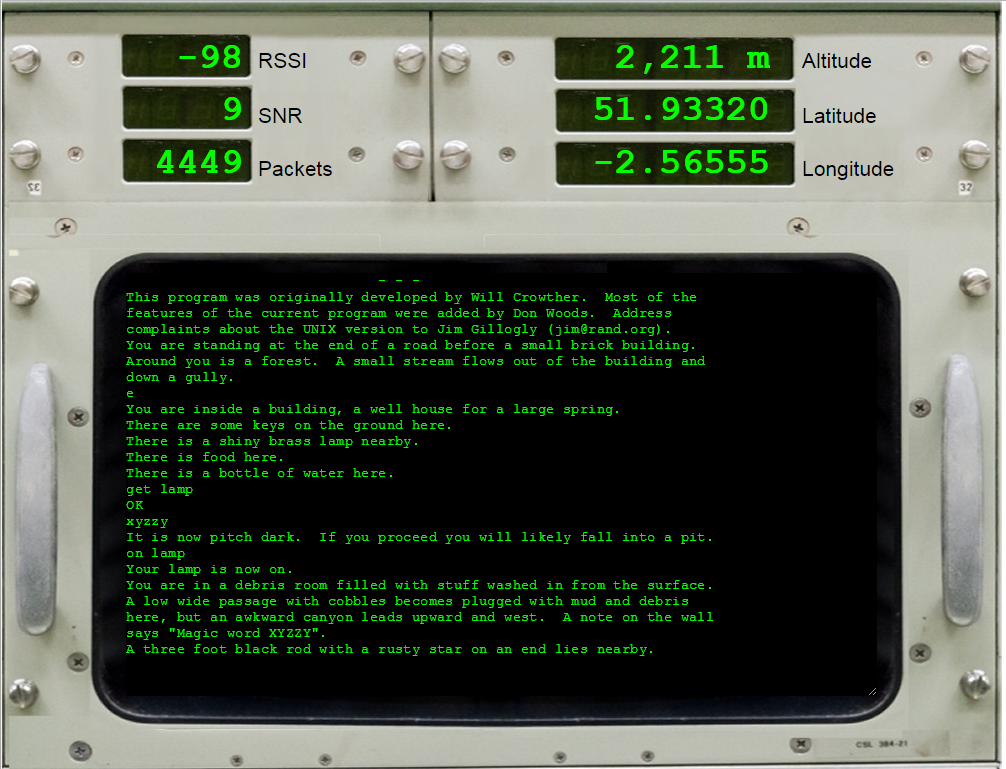
XYZZY
Next step was to run the text adventure “Colossal Cave”, which I remember playing around 1980. This can be installed on a pi with
sudo apt-get install bsdgames
I’d already installed it (as the payload doesn’t have internet access!), so I just needed to run it by typing “adventure” into my terminal window.
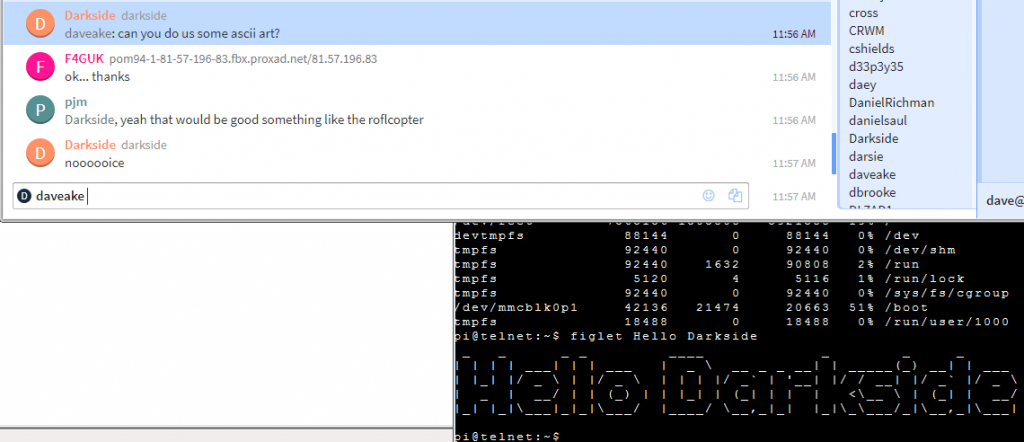
ASCII ART
One of the other balloonists on IRC asked if I could do some ASCII art, and conveniently I’d already installed figlet which does that!
Rebooting
Another request was to reboot the Pi, so I obliged:
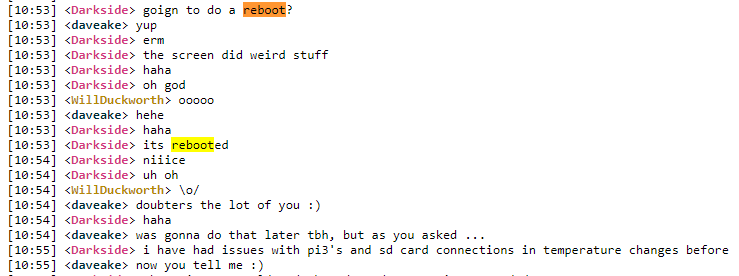
I don’t have a screenshot from the live reboot, but I do have one from when I previously tested this on the ground:

Chase
As mentioned, this flight wasn’t expected to go far, so I left the chase until shortly before the flight landed. We had a last position at 390 metres altitude which is plenty good enough to then find a position within radio range of wherever the payload actually is. Here’s the path that the flight took:
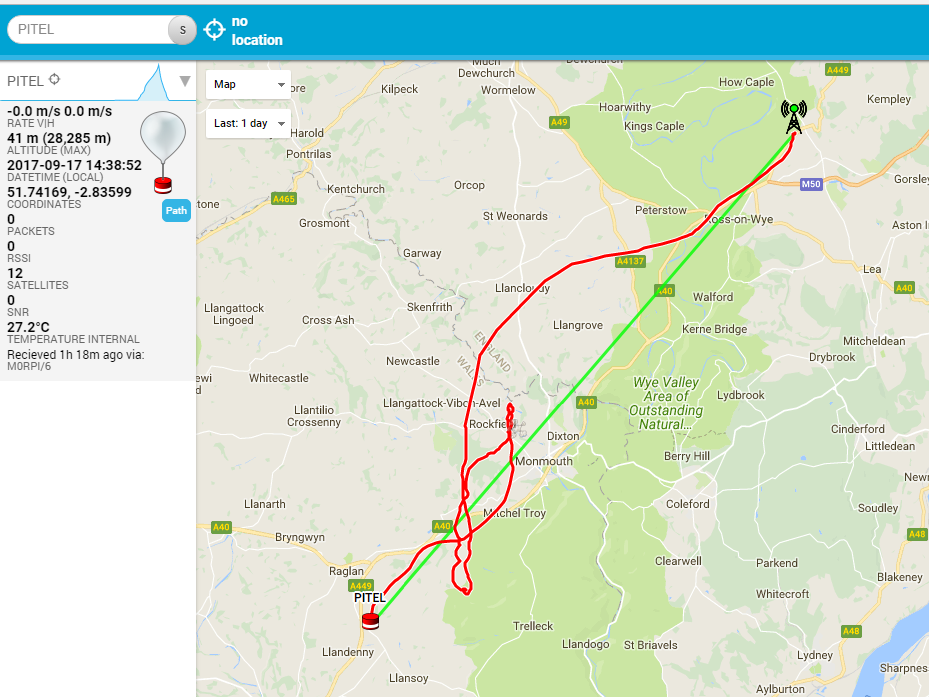
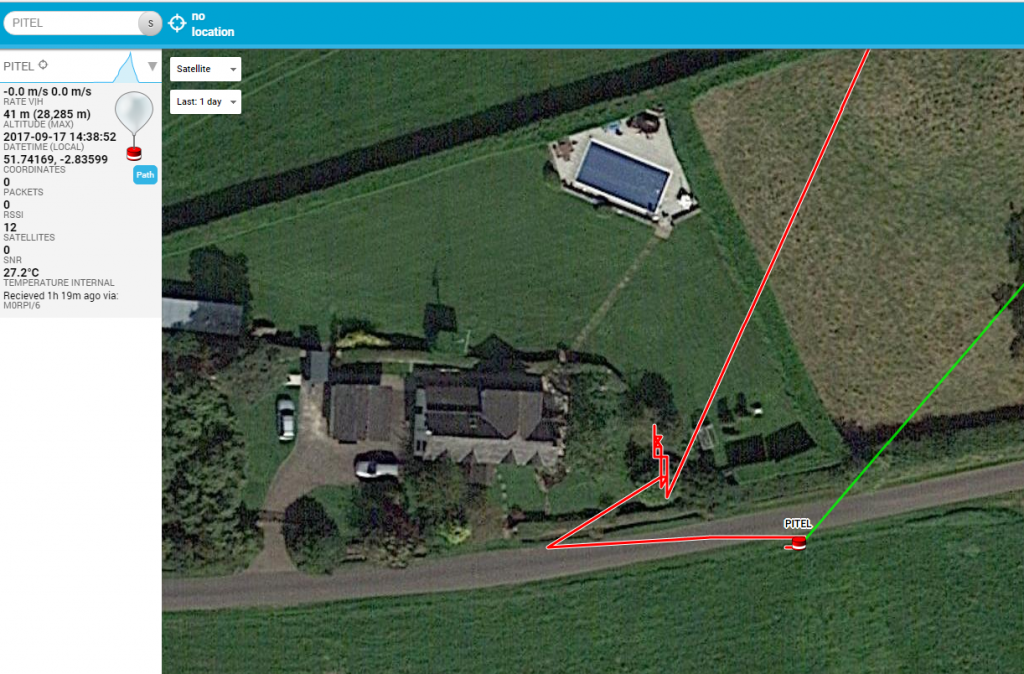
We parked up near the last position, switched on our mobile LoRa gateway, and soon received a new position with the landing spot. This was close to the lane that we were on, so we parked opposite and took a look. The payload was hanging from a small tree in someone’s front garden. We rang the doorbell, several times, but nobody in so as the payload was very close we just grabbed it from the tree.

and took it back to the car:
So, a very successful flight, and though the remote terminal and game-playing was just a bit of fun, it did show just how reliable the LoRa uplink is, and I’ll use that for other purposes in forthcoming flights.

Hoi Dave
was a nice flight for me
i writing 28 pakkets from you
and al lot of other frames i think control frames
mni tnx for a nice lora test
Hi Dave,
Another great post. I am interested in setting up a guided parachute for a balloon flight and you mention that the LoRa uplink could be used to provide a guided parachute new home coordinates but I have seen on some other forums that this might not be legal in the UK if setting up autonomous control for the guided parachute. I think I have seen a comment from 2016 that you may have posted this question to the CAA but I couldn’t find any definitive answer. I was wondering if you knew any more?
Thanks
The thinking is that the descending equipment then becomes an self-guided aircraft, which comes under different rules. I don’t necessarily agree, but I’ve yet to see any CAA advice on the matter.