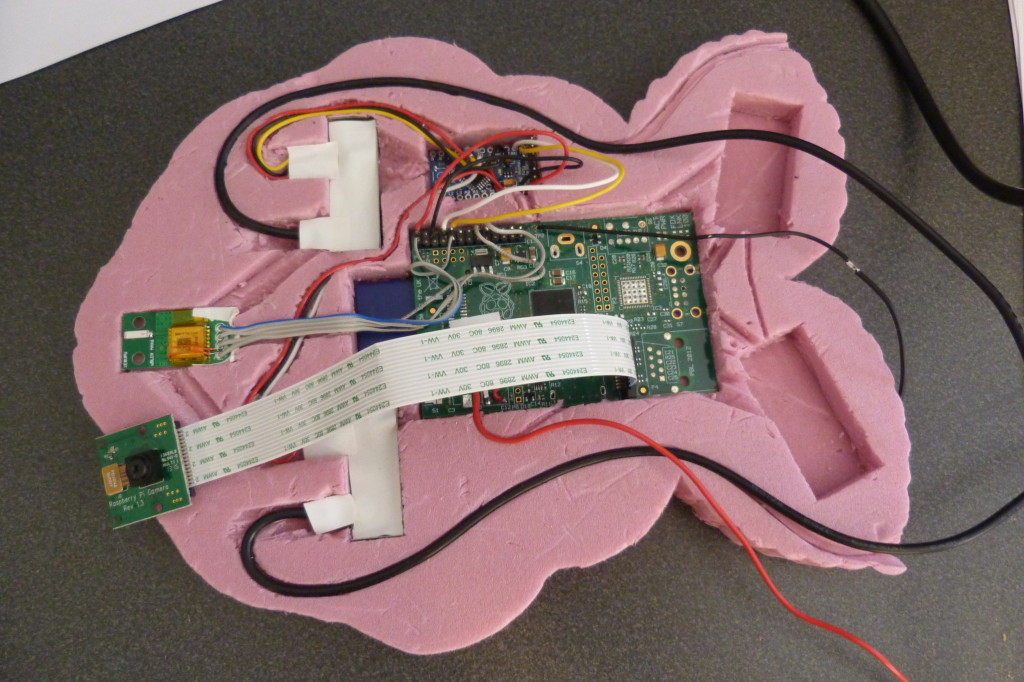
Back in March I built a lightweight Raspberry Pi tracker comprising a model A Pi and a pre-production Pi camera built into a foam replica of the Raspberry Pi logo:
The aim was to send images from higher than my record of just under 40km, so the tracker was pretty much as light as I could make it. A launch was planned in April but but the wind predictions back then were poor for such a flight with a “landing” out to sea. That was the flight with Eben and Liz from the Raspberry Pi foundation, so rather than lose a precious slot in their over-full diaries I decided to launch a “floater” which was eventually lost over Switzerland and is probably still in hiding somewhere in France. For that I made a more suitable payload box, keeping the original for a later date.
That was a great flight with, as far as I know, the only live images sent from a flight of that type. It was also the first flight to use the new Raspberry Pi camera, and it got some good images though overall the success rate was much lower than I hoped for. Part of the reason was the solid white cloud cover which makes exposure very difficult, but also I didn’t realise that the camera was defaulting to spot metering which is the worst of all possible options for the challenging lighting conditions when the balloon is high. Spot metering basically makes the centre part of the image a certain luminance, which means that if it’s pointing at the blackness of space that turns grey whilst anything else in the image whites out. There are always going to be some useless images during a balloon flight, unless the camera is “aimed”, but on that flight almost all the downloaded images were poor (and that’s despite the on-board software selecting the better ones!).
So, I wanted to get that resolved plus do the flight that I’d intended to do before. Liz and Eben weren’t available but the predictions for wind and weather were both so good that I decided to launch anyway. I’d applied for permission from the CAA and that was granted a few days before launch, and the predictions continued to look good (though at one point I was going to need to use a different launch site to avoid a landing near Bristol). I ordered some more hydrogen as I wasn’t sure my cylinder had quite enough left, and with the weather forecast saying “sunny all day” everything looked good. Last but not least was to get the latest Pi camera software and configure it to use matrix metering mode. I also changed the code a little to take 3 types of image each about once per minute: small images for one radio channel, medium for the other radio channel, and large just for storage on the SD card. Oh, and also I replaced the main voltage regulator on the Pi for a better one so that the entire tracker could run off a lower voltage so it could run for longer on the batteries. I tested that down to a mere 3V from a power supply (that’s 3V going IN to the regulator) and the Pi booted and ran normally. Here’s the regulator soldered in place of the normal one:

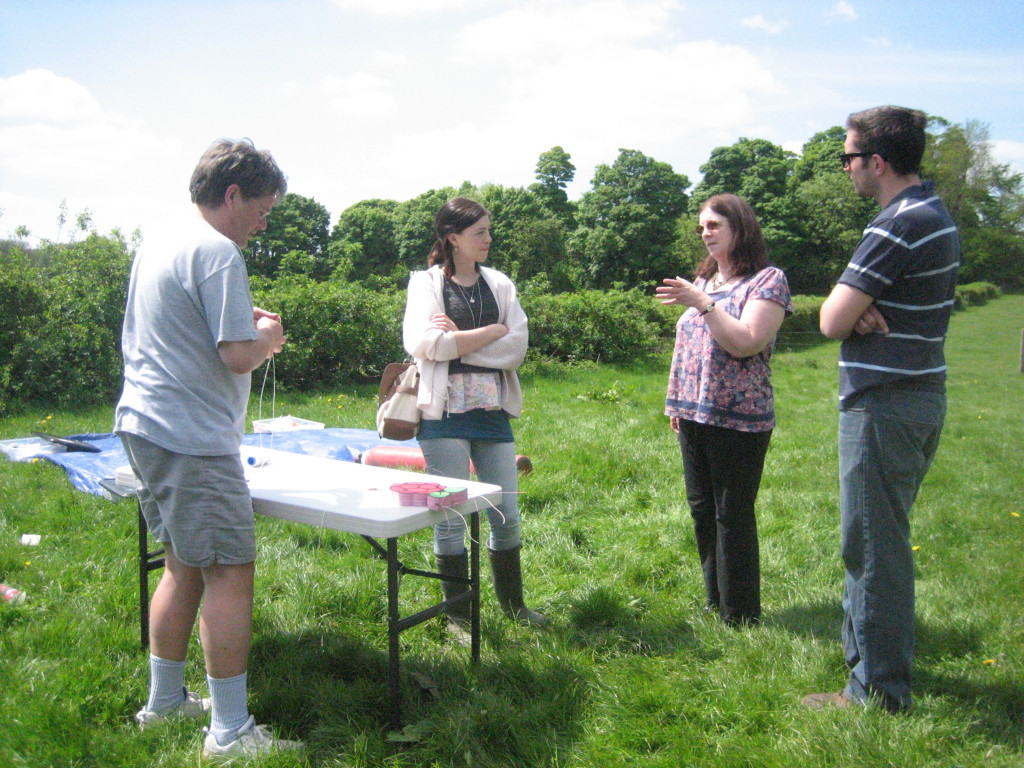
I had some people coming along to see the launch, so they know a bit more about how things work before I help them on a commercial launch in a few weeks time. Originally I intended the tracker to run from 4 AAA lithium cells but the runtime on those was around 4.5 hours, which would mean connecting the batteries at the launch site shortly before launch. Instead I decided to use AAs so I could have the tracker running and glued up much earlier, keeping things simple for the launch itself and meaning that I wouldn’t have to worry about delays while I explained things. The extra weight does reduce the maximum altitude somewhat, but I thought on balance it was worth doing.
The day was sunny as expected, and the wind was mostly still but with some gusts. I showed my guests how the payload is attached to the parachute:
and then inflated the balloon, tied to the parachute, and re-checked that the tracker was still running. It was, and of course it had been transmitting images during our preparations, including this one overhead:

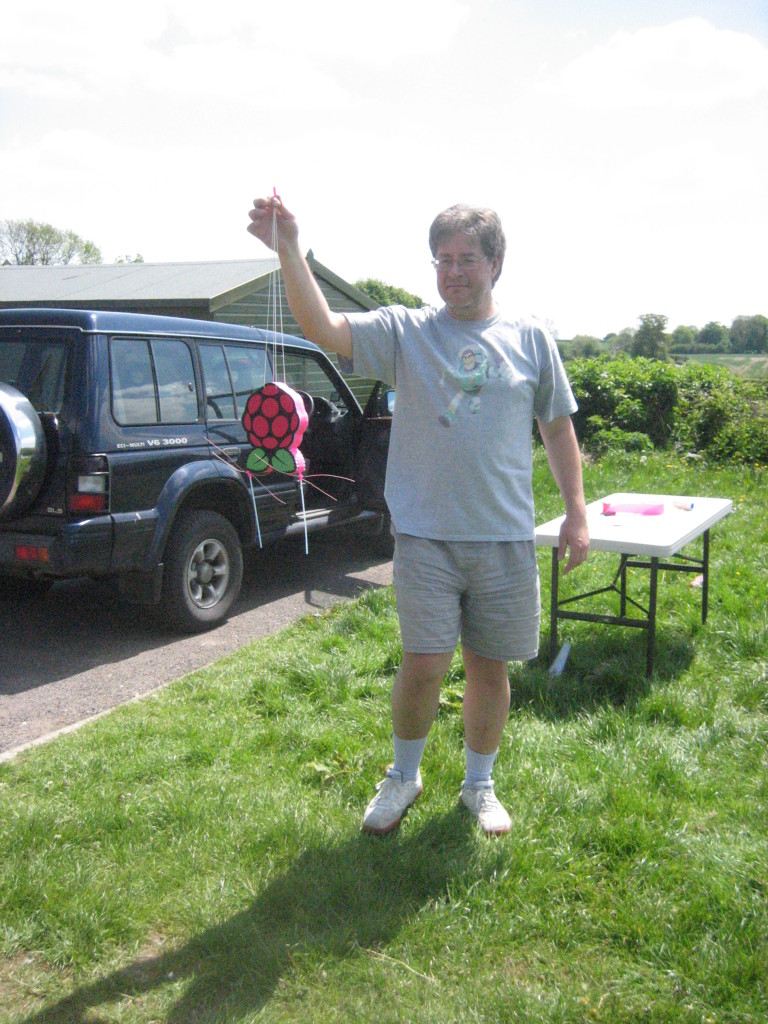
For launch the wind was very still so I just held the payload in front of the live streaming webcam and let go. Easiest launch ever!
The expected flight path showed a landing about 1 hour away by car:

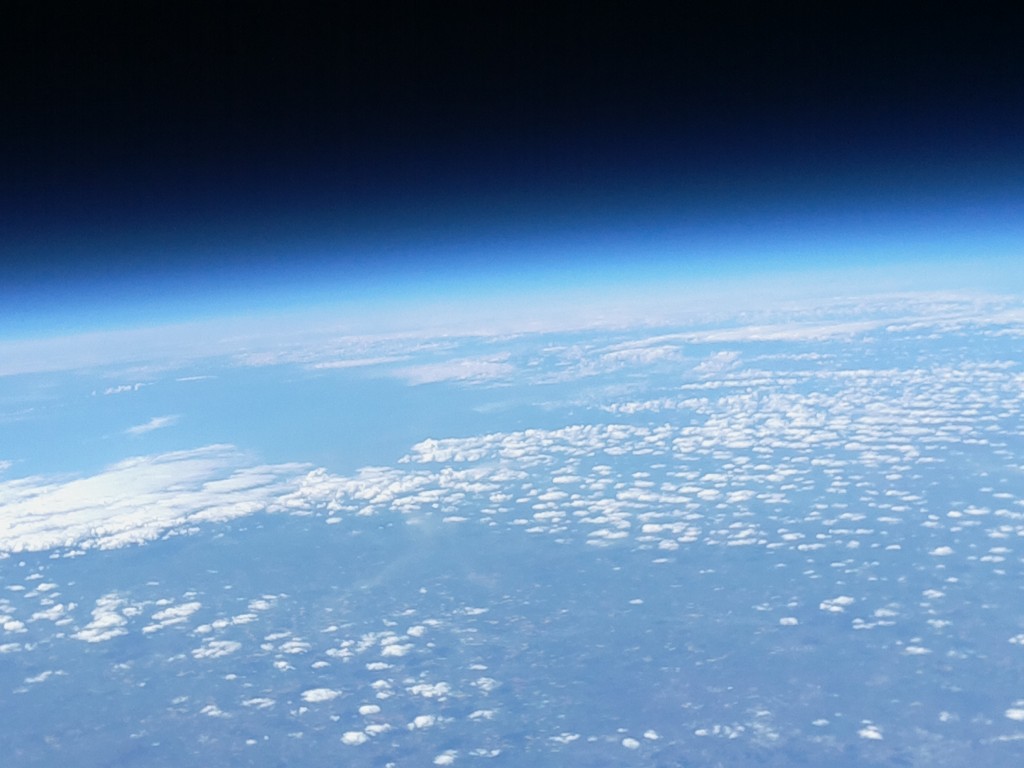
And with an expected flight time of over 3 hours that gave us plenty of time to return to my house and watch the images come in. Thankfully the matrix metering on the Pi camera worked very well and the images were excellent thanks to the good weather and camera. Here are some of the low-resolution ones from the first radio channel:


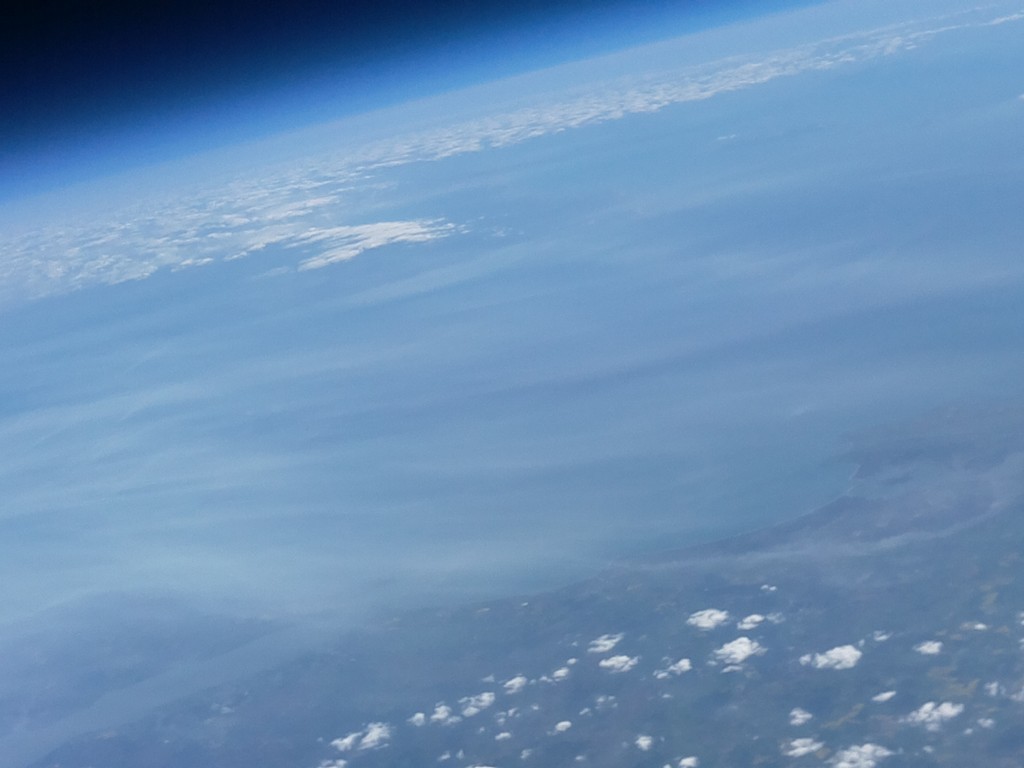
I was pleasantly surprised by how well the other balloonists collected almost all of the image packets. Remember that my payload had 2 radio transmitters, meaning that people had to choose which one to listen to (unless they happened to have 2 receivers). Also I was using a fairly high baud rate which limits the range, but even so there were listeners in Northern Ireland, Holland and France contributing! The image quality was excellent and the matrix metering was certainly working well. Here are some of the larger images sent by the second channel, including this one of southern England and the Isle of Wight:


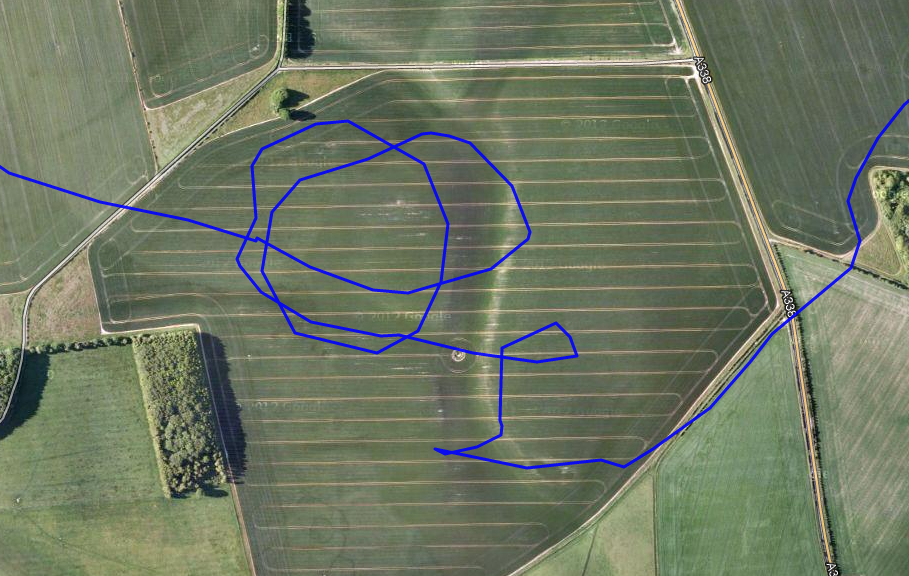
The flight path itself was interesting, with many changes of direction, including a few loops!
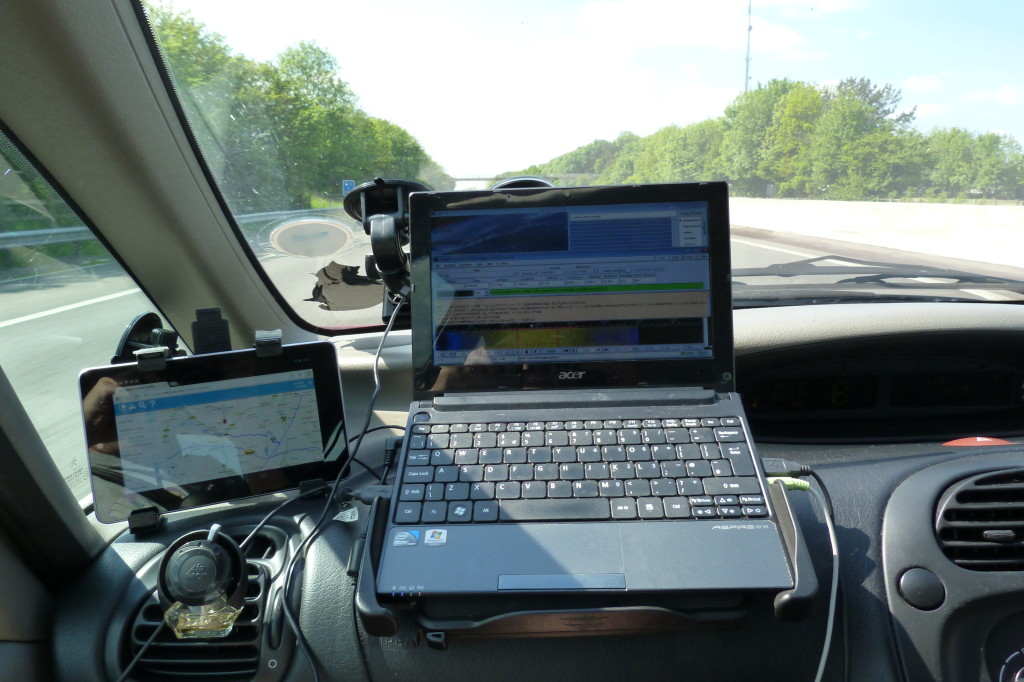
Whilst it’s great to sit and watch the images come in from your own flight, eventually you have to go and chase the thing down and recover it! Julie drove us in her car with me running the tracking:
Then I made a mistake. The original prediction (shown above) was for a flight earlier in the day, but the launch was delayed by more than 2 hours (partly to avoid a frequency clash with an earlier flight, and partly because we took our time). The later launch meant the balloon flew in more gentle winds so wouldn’t travel as far. Forgetting this, I asked Julie to drove close to the original landing spot. Also, it’s generally best in the first part of the chase to just get to a good position and wait for the burst, instead of assuming it will land where you thought. Once the burst has happened then you have a much better idea of the actual landing point. The end result of all this was that when the balloon did burst, and came down more quickly than expected (more on that later) we were in completely the wrong place.
By the time we got to the landing area, the payload had been on the ground for a few minutes. We had a rough idea of where it was and we went along both of the small roads nearby. Normally I’d get a radio signal within say 1 mile of the landing spot, but we got nothing at all. It seemed very unlikely to me that the radio transmitters had stopped working altogether – the batteries were soldered on so it would need a really hard impact to break the connection. The landing had been hard but not that hard. We tried a few highish points where I got the Yagi aerial out (much more likely to pick up a weak signal) but still got absolutely nothing. Very confusing.
I was about ready to declare the payload lost when my mobile phone rang. I thought it was going to be one of the other balloonists with advice, but instead it was someone who asked if I’d lost “a parachute with a raspberry and a big lump of latex”! My payload had been found! I asked for his address and said we’d be there right away. Typing the address into my phone it said we had a 14 minute drive – also strange! I reported to the other balloonists on IRC what had happened and they then saw my car travelling several miles into Swindon. They were probably as confused as I was as to how the balloon had managed to move that far from its last known position a few hundred metres up!
We got to the address and were happily reunited with the payload, parachute and almost all of the balloon! Then we found it what had happened – the lot had landed nearby (and right at the position given to me on IRC!) when he was out in the countryside at this place (exactly where I was told it would be on IRC – thanks Mike Willis!):

First he heard a loud thump as it landed, then he looked and saw a big lump of latex etc on the tarmac a few metres in front of him! He took it home and then, because of the smell of latex, put it in his garage. Of course I’d put my mobile phone number on the outside so once home he called me. We picked up the signal again when within a mile of his house, and were decoding when about half a mile away. The picture coming in was completely black, because the camera was face down! Now of course we understood why we couldn’t get a signal earlier – it had been driven several miles away from us! The reason for the rapid descent was also obvious – about 70% of the balloon (1.1kg) was still in one piece and had wrapped itself around the parachute. Here’s our happy rescuer with the remains of the flight:

The eagle-eyed may notice the small hole in the side of the raspberry, and that’s where the camera looked out, taking this photo of me as I photographed it:

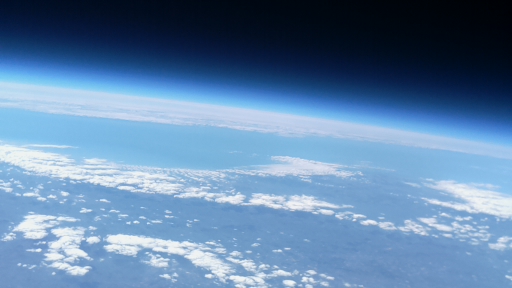
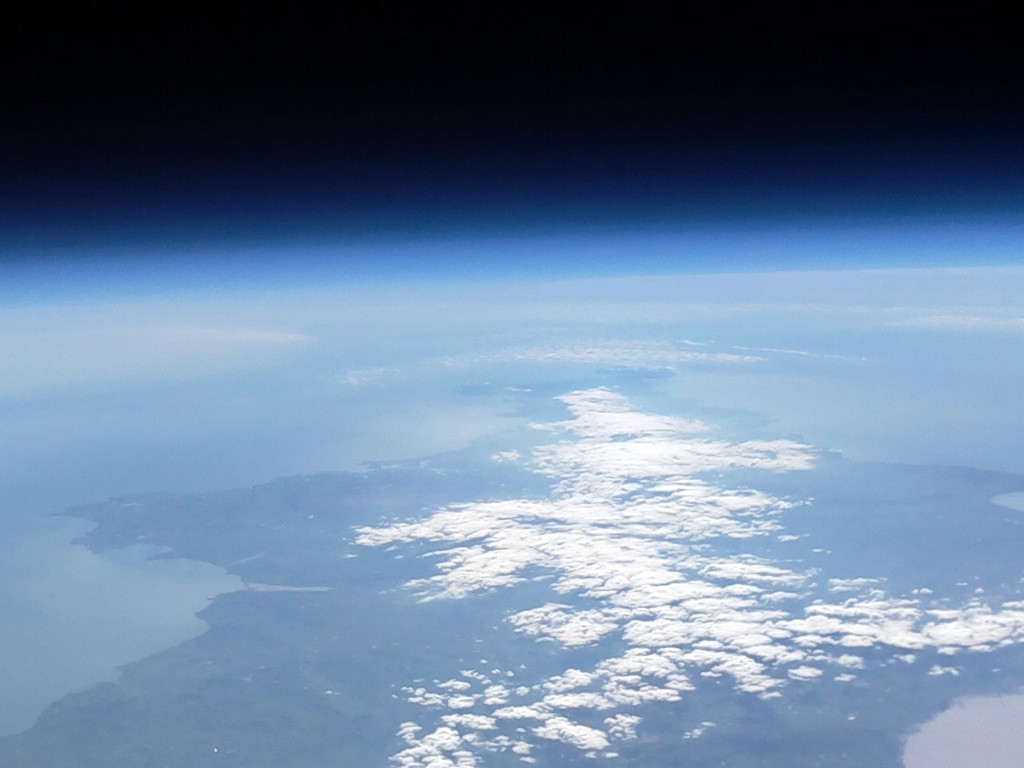
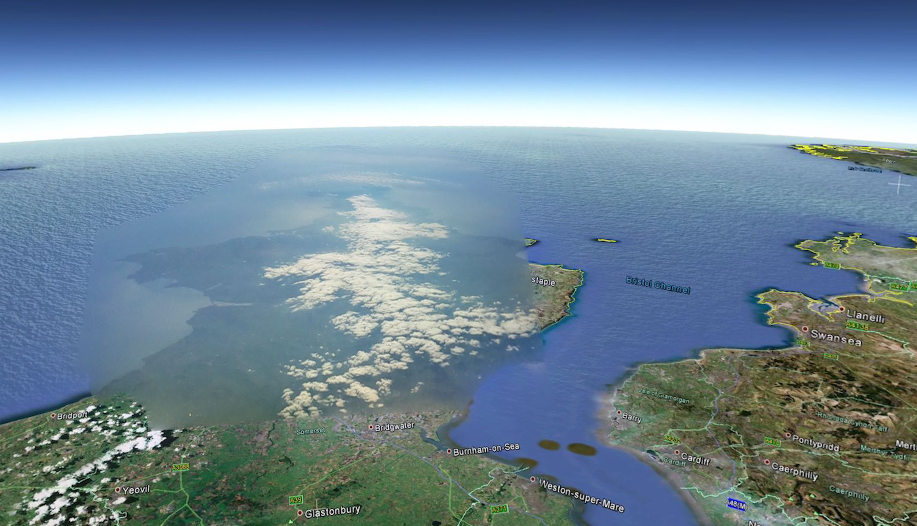
Back home I copied all the images from the SD card, including of course all the full-resolution ones, including the ones below. The first and in my opinion the best is image file “snap314.jpg” – some coincidence! This is a view over Devon and Cornwall, taken at about 38.9km altitude and almost directly over the house of the guy who recovered it!


Finally, and thanks to Geoff Mather, here’s the flight path (click for an animated 3D model):

and the view from the payload, in Google Earth, with part of one of the actual images overlaid (again, click the image to play with the model):
Congrats on a successful flight – you’ve got some great pics there!
What a great project! It’s so satisfying when a technical challenge ends so successfully!
Absolutely fascinating! Thank you so much for sharing.
Loved this article. Really happy it all worked out well. Congratulations.
Tremendous! Such a great set of pictures and a wonderful championing of Raspberry PI. Congratulations.
fantastic project!!!
great photos and great work !!!
Wow, great project. Enjoyed looking at the photos.
Inspiration for students!
Simply awesome , next stop the moon!?
Can these images be useful for the openstreetmap project? It would be great if there were a free resource of satellite images, but I guess it requires keeping the Pi up in the sky a bit longer than this project. Still pretty amazing this is all possible these days!
Nice
i have a question
if these balloons have a valve to let out some air before they blow up, wont they be flying much longer or perhaps even stay in the air?
and another idea:
what if you had a larger ballon
and a fishing line connected to the balloon, wont it be able to stay in the air like a surveillance drone
You control the altitude with a valve – this has been done. Or (like my previous flight) carefully fill with the right amount of gas to achieve a float.
UV kills latex anyway so they won’t stay up for more than 1-3 days.
http://www.tweaktown.com/news/30643/makertt-raspberry-pi-camera-module-photographs-the-earth-from-the-edge-of-space/index.html
This is COOL! Would you mind elaborating a bit more on the radio setup for someone who knows basically nothing about RF equipment?
Take a look at http://ukhas.org.uk/guides:tracking_guide
Can you talk more about the transmitting radios? That site focuses mainly on decoding transmissions. Thanks!
In that case, read http://www.ukhas.org.uk/guides:linkingarduinotontx2
Dave
It is so wonderful !
Enjoy the photos?
Awesome work here!
Brisil. Porto Alegre. rio grande dul.
Parabenz ,Belas fotos e um Trabalha magnifico.
Me chama, Ginno ,Gosto muito de fotos do espaço.
Um forte abraço. Venha visitar o Brasil. O Brasil é um belo Pais com pessoas agradaveis.
Porto Alegre é a capital do rio grande do sul
Incredible! I love the pictures and story.
Amazing what technology is now allowing us to do. What would a cost estimate be to be able to do the same thing from scratch.
So all I have is a computer, no radio equipment, no raspberry pi, no camera, no balloon…etc…? $2000 USD?
Thanks very much.
Simply Amazing.
Fantastic! The pictures have come out *much* better than last time 🙂
P.S. What /was/ the maximum altitude on this flight? Did you manage to break your previous record as you were hoping?
About 38.9km, so no 🙁
Congratulations, man!!! Great pics!!! Thanks for sharing!!!
Hello Dave,
do you use this predictor http://habhub.org/predict/? If so could you elaborate on the accuracy of the initial flight prediction? For example do the payloads usually land in 10km radius around the predicted spot, or more?
Thank you for feedback
Tom
Yes, I use that one. So long as you use an up-to-date prediction (run it before you set off for the launch), and your ascent rate and burst altitude are accurate, then it’s pretty good. Actual accuracy depends on a lot of things e.g. how far the flight is, so it’s hard to give a figure, but 10km is about right.
Fantastic project and many thanks for sharing. I love my Pi, using it as a webserver under Wheezy and an excellent media centre with XBMC. How much fun can you have with a £30 package? You’ll find me on Facebook under Alan Cooper, I’d love to keep in touch to exchange ideas.
Cool ~~ Thanks for sharing, I’ll have a try
Tremendous work, Dave, and a fascinating read. Thank you.
Wonderful story… All is well that ends well. I remember during my Ph.D days (1980s) my friends used to prepare for their payloads for year or so (in INDIA); then another months of wait for the balloon flight. Then the bad news of some thing out of unexpected not working would make their Ph.D tenure stretching to 7+ years (Murphy’s Law).
Come..2013; Dave takes just around a month or so to accomplish his aspiring ambitions…that too at a cost of “pea-nuts”. Thanks…. Raspberry..
There is a lot one can do with RP; Why not to fly a few hundred $ worth spectrometer from Ocean Optics; which is under 200g.
What I don’t understand is how you were getting a live feed ? – As in, internet connection? (Sorry didn’t read the whole article – I’m at work)
It had no internet connection – all telemetry and images were sent by a low power radio link.
Dave,
Would you mind sharing the bash script you used in your project? I’m using a similar hardware setup for my upcoming launch, but as I’m sure you recall, determining the interval / quality of your photos and balancing with available storage space is a little tricky. Thanks!
Seth
This is amazing project!
One comment: have you considered using UBEC-like switching power supply instead of standard voltage regulator? UBEC is tiny, costs a few £ and it is much more every efficient (> 90%) than these wasteful resistors-based regulators.
Yes and I have in other flights. However the drop-out voltage is higher so I’d need an extra battery (adding weight), and the linear regulator is efficient enough for a “normal” flight of a few hours.
Do you have any build details for this flight? From the picture it looks like you used an Arduino to connect the two radios to the Pi. Is there any way to get the Arduino code? Are you also willing to share the details for the Pi? I’m curious how you programmed the taking of the three separate images.
Excellent project, and really motivating.
Hi Dave ,.
That was really cool,… Im also working on a similar kind of work.
What im trying to do is take only my Pi with the camera attached alone to it, to a mountain top ().
And then keep them fixed for an hour or two, take Time-lapse images of the clouds that passes around the mountain tops. The images that i have shown you was taken with a proper point and shoot camera under programmable, Manual and Auto mode. after reading your post i understood that i have to consider some other factors too,.. The trip that i have planned now is within a week and also its goin to be a one shot for me . may be the next trip for me would be only by 2015. since this plan is a single shot untill next year i need to get the resulting images not excellent or not bad, but to some extent.
Right now im working with the power supply, Time interval script and few others. so can you help me in the exposure and the matrix metering mode that you changed for the rasp cam. plz,..
WoW