Like many UK high altitude balloon projects, the main communications from my balloon will be a low power radio transmitter using the unlicensed 433MHz band. There are lots of advantages to doing this, not least being the fact that other HAB enthusiasts can “tune in” to the signal and update the balloon’s location on an internet map even if my own ground crew can’t get a signal for whatever reason.
Because the signal is low power (about 100’th of the power of your mobile phone), it needs a good aerial and sensitive receiver to pick it up from 20-100 miles away. The well-trodden path is to use an amateur radio receiver hooked up to a PC to decode the signal. The signal itself is a sequence of high and low tones that when decoded will give the name, location and speed of the balloon plus other optional data such as temperatures. The program then uploads this data to a web site which anyone can use to see where the balloon is on a map!
As I don’t have a radio receiver yet (a team member will be providing one later on), I thought I’d do some basic testing of this decoder software by generating the high and low tones from the Arduino SBC (single-board computer) that I will be using as the flight computer. So this evening I spent a couple of hours doing just that. I hooked up a pin of the Arduino to my PC’s sound card so I could listen to the tones and feed them into the PC decoding program. Next step was to find out how to get that pin to whistle the high and low notes. After that I needed to encode a little message (not the GPS data just yet!) as the correct sequence of high and low tones, and with the correct timing. Here’s the result:
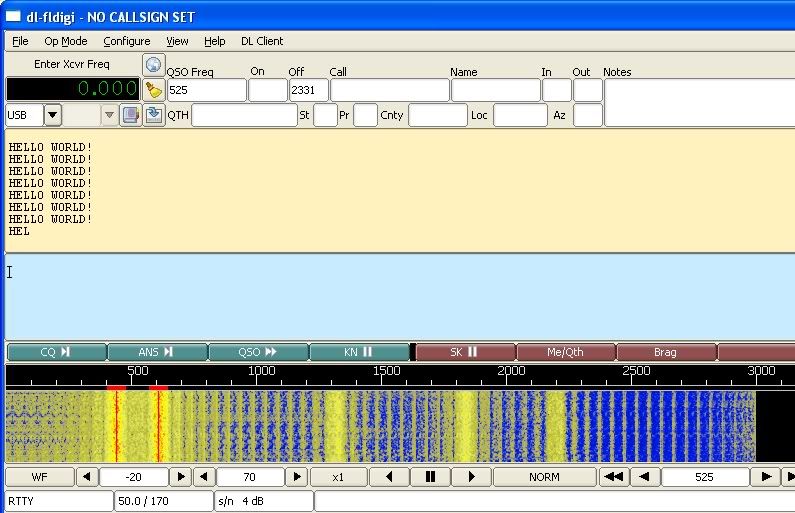
Anyone who knows much about electronics might be a bit shocked at all the harmonics (yellow noise away from the vertical red lines), but that’s because the Arduino pin is digital and is generating a square wave not a nice pure sine wave. No problem since the decoding software is working just fine regardless. All of this is just a test – in the balloon the tones will be generated properly by the radio transmitter and not the Arduino.